If you are getting the error that g++.exe has stopped working , you might be using Bloodshed Dev C++ in Windows 8 /8.1/10 Operating System. Whatever it may be I’ve faced this problem several times during executing my programs in the Dev C++ compiler . It generally happens when you install Dev C++ and try to compile a cpp file in Windows 8/8.1 or in Windows 10, a windows pops-up saying that g++ has stopped working. Its not so easy to figure out the problem as not all of you might be using same version of Dev C++ Compiler and may be even on different Operating Systems.Whatever it may be , in this post I will discuss a few methods. Any of these method might work for you. I recommend to follow each method step by step and follow each method one after another.
- How to fix g++.exe has stopped working problem?
Method 1
In this method , it is just changing of various parameters , this could fix the g++ has stopped working error. I recommend this method for 64-bit users ( people mostly using laptops are 64 bit ) and I recommend Method 2 for x86 ( 32-bit users ).
Step 1 :
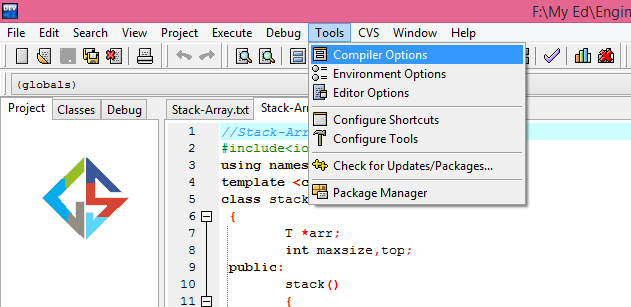
Click on Tools in the top bar as shown in the screenshot and select Compiler Options
Step 2 :
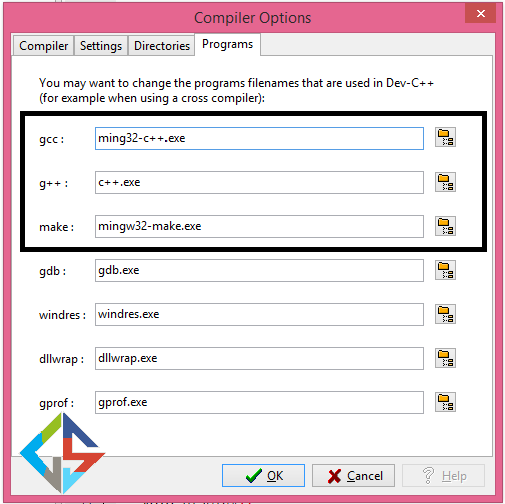
Select Programs pane in the Compiler Options window and change the gcc , c++ , make parameters.
Note:
- In the newer versions make still stands as mingw32-make.exe , don’t change it.
- These parameters may be same be shown in your Dev C++ Compiler ( based on the version ) , if problem still persists , skip to the next Method.
Step 3 :
Execute your program , its done !
If the above method , didn’t work try the next method.
Method 2
(Recommended for x86 bit users)
Step 1:
In this method , I recommend you to download the most stable version
Dev C++ here ( wait 5 seconds for the download to begin ) and I personally tried this method using this version of Dev C++.
After downloading the above version of Dev C++ , download the below two important header files as these below header files mostly fixes all the errors with Dev C++ on Windows 8/8.1 and Windows 10 even and works fine.
Step 2 :
Click on the files to download the header files. These files are open source anyone can download them and edit them.
Step 3:
After downloading both the files , paste them into the following destination folder.
C:\Program Files\Dev-Cpp\MinGW64\x86_64-w64-mingw32\include
Start Dev-C++ on your compiler now you can work with Dev C++ seamlessly without any errors. This method mostly works and I’ve tested it. You won’t get g++ exception during compilation.
If the above solution doesn’t fix the problem you can download the updated
setup which includes
Latest Dev-C++ (32bit and 64bit). You can
Dowload Latest Dev-C++ here (47MB) and comment the errors you face during this procedure.
Loading…